Quick Start Guide - Your First Search!
Video - Getting Started with Avantis
This 7-minute video illustrates the 12 most important steps in searching that are also outlined below in this article:
Below are the 12 most important steps, illustrated in the 7-minute video above, to getting started searching on Avantis
-
Steps 1 to 6 are necessary
-
Steps 7 to 12 are optional
-
We also suggest you take in our full online training here -
Your First Training Session - Recorded Demo
(video also appears at the bottom of this page)
-
This training will introduce a lot of tips and tricks to streamline your workflow and get you the best results and experience using Avantis
-
The demo can be consumed in smaller 5- or 10-minute chunks at your convenience
- Below are the most important 12 steps in constructing a search.
1 - Pick a dataset
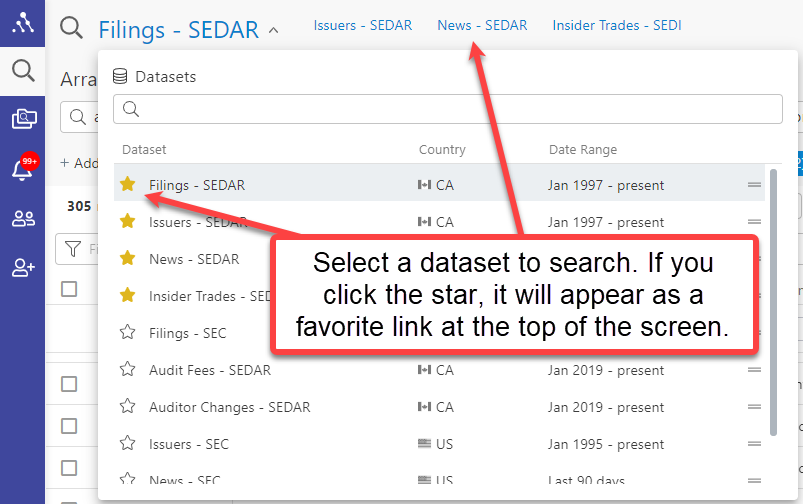
The first step to constructing a search is to pick the dataset you would like to search in using your dataset selector
Datasets include:
- Canadian Filings - from SEDAR - produces a list of documents as an output. A document from any issuer links to their Issuer Profile.
- Canadian Issuers - from SEDAR - produces a list of issuers as an output. The profile of each issuer links to their Filings.
- Canadian News Releases - from 13 newswire services, including all of the TSX recommended newswires, plus investment sites that profile issuers and write articles about them - produces a list of press releases and investor site articles as an output. Each article links to the Issuer Profile.
- Canadian Insider Transactions - from SEDI - produces a list of insider trades as an output. Each trade record links to the Issuer Profile.
- US Filings - from EDGAR - produces a list of documents as an output. A document from any issuer links to their Issuer Profile.
- US Issuers - from EDGAR - produces a list of issuers as an output. The profile of each issuer links to their Filings.
- US News Releases - from 13 newswire services, including all of the TSX recommended newswires, plus investment sites that profile issuers and write articles about them - produces a list of press releases and investor site articles as an output. Each article links to the Issuer Profile.
- US Insider Transactions - from SEC - produces a list of insider trades as an output. Each trade record links to the Issuer Profile.
- Canadian Audit Fees - from Avantis, sourced from SEDAR filings - produces a list of audit fees, related fees, tax fees, other fees, etc., as an output. A fee record from any issuer links to the source documents as well as to their Issuer Profile.
- Canadian Auditor Change - from Avantis, sourced from SEDAR filings - produces a list of auditor changes, recording former and successor auditor and dates of change. A change record from any issuer links to the source documents as well as to their Issuer Profile.
2 - Add criteria
-
Add criteria that you'd like to use in your search by clicking on the
+ Add criteria
button
- Click into any criteria added to your Search Panel
-
Use dropdowns to reveal options, where applicable
-
Use type-ahead fields to filter suggestions, where applicable
-
Choose selections of interest to limit search results
- See search Using Search Criteria in Your Search for more detail
3 - Add a full text search
-
Do this only if you are looking to see specific language or disclosures highlighted in your results
-
You can search for simple words or phrases or else use
Terms and Connectors searching
to increase the level of control you have
(up to an almost absolute level) over the kinds of results you get
- See Full Text (Boolean) Searching for more information and resources
4 - Click Search
- Click the blue Search button on the upper right
5 - Navigate your results
-
Click into a result and it will appear in the viewer on the right
-
Use the
Key Words in Context (KWIC) pane
to look over the instances of your search terms, as they appear in context in the document
(
A
in the above image)
- Click on any search term you see in the KWIC pane that you'd like to navigate to that location in the full text of the document
- Search for any new terms or language you'd like to see in the document by using the Full Text Search field at the top of the document ( B in the above image)
- Navigate to the next hit using the Next Hit buttons ( C in the above image)
- See Your First Search - Welcome to Your Document Viewer for more detail
6 - Click into the Issuer Profile
-
Click on the issuer name at the top of your full text document in your viewer to see the
Issuer Profile
-
Issuer Profiles
are portals to lots of rich information and data about the Issuer in question
- See Enhanced Issuer Profiles for more detail
7 - Download results
Export results one by one or into a single zip file.
Export a page range to a PDF file.
You can download results in four ways:
-
Starting from your result list, method 1
- Click on the
download icon
on the far right hand side in your
result grid
beside any result
-
This will download the document without any search terms highlighted on it
-
Starting from your result list, method 2
- Click on the
checkboxes
beside documents you'd like to add to a zip file to download (up to 50 documents at a time) in your
document viewer
and then click on the
ellipsis
(three dots icon) on the right hand side at the top of your grid and choose
Download
- Starting from a full text document, method 1 - Click on the gear icon on the upper right of any result in your document viewer and choosing download
-
This will download the document without any search terms highlighted on it
-
Starting from a full text document, method 2
- Click on the
gear icon
on the upper right of any result in your
document viewer
and choose Print
-
This will allow you to select page ranges to download to PDF
-
This will also allow you to include the hit highlighting on the document you print
- See Saving Portions of Documents for more detail
8 - Choose and sort your result list columns
-
Select the data points you would like added as columns to your result grid using the
Column Chooser
-
Sort columns using the
"hamburger" icon
on the right of each data point (the two short horizontal lines)
- See Selecting and Sorting Columns for more detail
9 - Export your result list as a spreadsheet
-
Click on
checkboxes
on the left of your result grid's line items or else click on the
global Select All checkbox
in the header of the checkbox column to select items to export
-
Click on the
ellipsis
(three dots icon)
on the right hand side at the top of your result grid and choose
Export
and then choose a format
- See Exporting Your Results Grid as a Spreadsheet for more detail
10 - Save your search
-
Click on the
Save Search icon
at the top of your screen and name your search to save it
-
It will be added to your
Saved Searches drop down
menu
- See Saving and Sharing Searches for more detail
11 - Set up your search as an alert
This will allow you to automatically receive emails with any new results that meet your criteria in the future
- Click on the Alert icon beside the name of your active search (or beside the name of any search in your Saved Searches drop down menu )
- Enable the alert
- Enable Send notifications
- Choose an email schedule according to which you would like to receive results
- See Setting Up (and Deactivating) Alerts for more detail
12 - Share your search with other members
- Click on the Share Search icon beside the name of your active search (or beside the name of any search in your Saved Searches drop down menu )
- Choose the members you would like to share your search with and set up alerts for them if so desired
- See Saving and Sharing Searches for more detail
Video - Your First Training Session - Recorded Demo
To book a live, personalized training demo for you or your group, please reach out to
support@avantisai.com
and we'll be happy to arrange one for you.
For a full online training, view the below video in one sitting, or broken up into smaller portions, at your convenience:
For a labeled screenshot of the Search Panel, see
Your First Search - Welcome to Your Search Panel
For a labeled screenshot of the Result Grid, see
Your First Search - Welcome to Your Results Grid
For a labeled screenshot of the Document Viewer, see
Your First Search - Welcome to Your Document Viewer
For questions or inquiries, please email
support@avantisai.com
Related Articles
Full Avantis Demo (60 mins)
Below is a full length (60 minute) video training session that is a great introduction to Avantis for those who want to benefit from a comprehensive training. For those who prefer their tips, tricks, and demos delivered in bite-sized pieces, every ...